Nav2 pt3 Gazebo setup
Gazebo is a simulation software suite. It can simulate many kinds of sensors such as Lidar, Depth sense cameras, IMU, and more.
Here is the official link to their website if you want to learn more
We are going to set up Gazebo simulation for our project
Install
sudo apt install ros-$ROS2_DISTRO-ros-gz
New nodes
Inputs:
| Name | Type |
|---|---|
/cmd_vel | geometry_msgs/Twist |
Outputs:
| Name | Type |
|---|---|
/joint_states | sensor_msg/JointState |
/odom | nav_msgs/Odometry |
/tf | simulated robot joints |
Params:
| Name | Type |
|---|---|
config_file | file |
world_sdf_file | file |
description:
Simulates a whole robot and world to debug and test quickly
In the last guide was what our nodes looked like
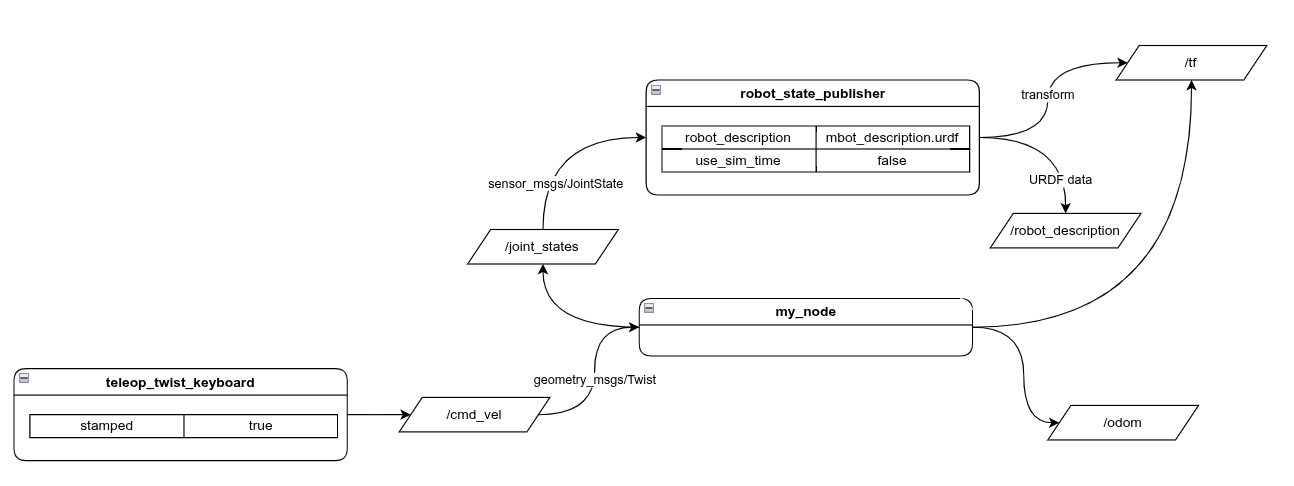
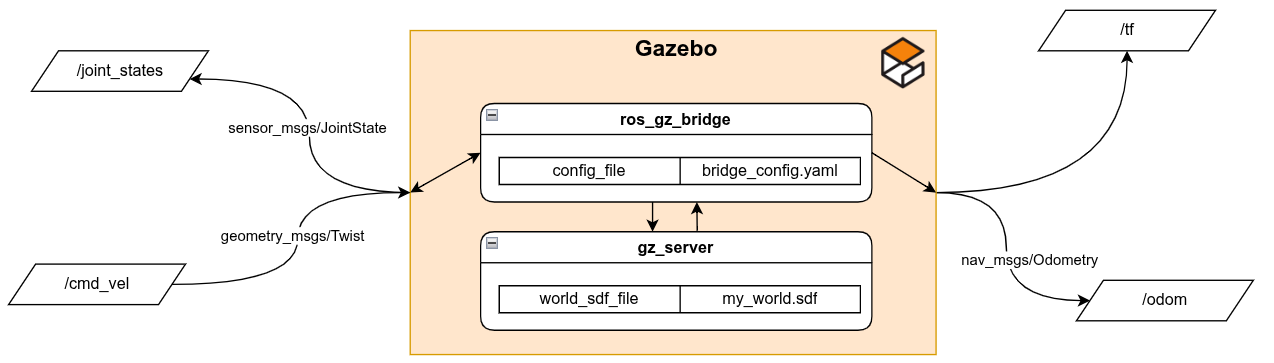
Let us add Gazebo into our node diagram
New Node diagram
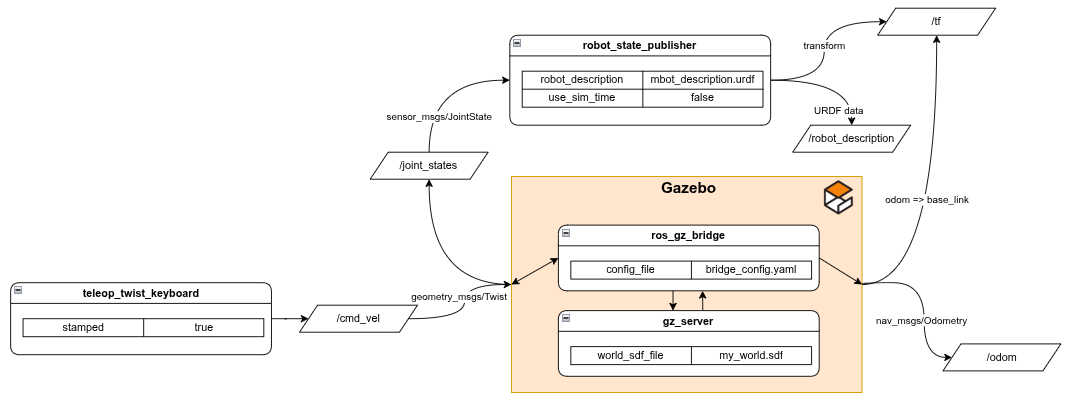
All we have done is simply swap my_node for Gazebo to switch between a physical robot and simulated robot
There is a general trend of just being able to hot swap nodes in ROS which is part of the reason it is so powerful.
What ever robot_state_publisher is connected to (debugging, real robot, sim) and robot_state_publisher does not know. Even the swap is simple only requiring one node change.
Adding gazebo configs
Gazebo takes a config file called bridge_config.yaml that just maps all internal Gazebo topics to the external ROS topics.
All Gazebo topics must bridge though the ros_gz_bridge node
i.e. maps internal Gazebo topics to ROS topics
Make a folder called config and put a file inside called bridge_config.yaml
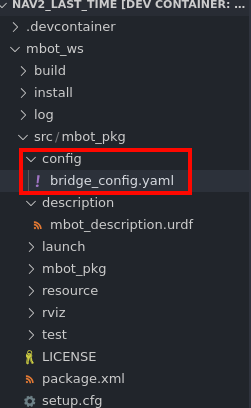
paste this inside bridge_config.yaml.
This file just describes what topics to bridge between ROS and Gazebo
  ---
- ros_topic_name: "/clock"
  gz_topic_name: "/clock"
  ros_type_name: "rosgraph_msgs/msg/Clock"
  gz_type_name: "gz.msgs.Clock"
  direction: GZ_TO_ROS

# Topic published by DiffDrive plugin
- ros_topic_name: "/odom"
  gz_topic_name: "/odom"
  ros_type_name: "nav_msgs/msg/Odometry"
  gz_type_name: "gz.msgs.Odometry"
  direction: GZ_TO_ROS

# Topic published by JointStatePublisher plugin
- ros_topic_name: "/joint_states"
  gz_topic_name: "/joint_states"
  ros_type_name: "sensor_msgs/msg/JointState"
  gz_type_name: "gz.msgs.Model"
  direction: GZ_TO_ROS

# Topic subscribed to by DiffDrive plugin
- ros_topic_name: "/cmd_vel"
  gz_topic_name: "/cmd_vel"
  ros_type_name: "geometry_msgs/msg/TwistStamped"
  gz_type_name: "gz.msgs.Twist"
  direction: ROS_TO_GZ

- ros_topic_name: "/tf"
  gz_topic_name: "/tf"
  ros_type_name: "tf2_msgs/msg/TFMessage"
  gz_type_name: "gz.msgs.Pose_V"
  direction: GZ_TO_ROS
Updating urdf
To be able to drive the robot in Gazebo we need to add this plugin at the bottom of our mbot_description.urdf right before the </robot> tag.
This plugin does emulates most of what my_node did.
  <gazebo>
    <plugin filename="gz-sim-diff-drive-system" name="gz::sim::systems::DiffDrive">
      <!-- wheels -->
      <left_joint>drivewhl_l_joint</left_joint>
      <right_joint>drivewhl_r_joint</right_joint>

      <!-- kinematics -->
      <wheel_separation>0.4</wheel_separation>
      <wheel_radius>${wheel_radius}</wheel_radius>

      <!-- limits -->
      <max_linear_acceleration>1.0</max_linear_acceleration>

      <!-- input -->
      <topic>/cmd_vel</topic>

      <!-- output -->
      <odom_topic>/odom</odom_topic>
      <tf_topic>/tf</tf_topic>

      <frame_id>odom</frame_id>
      <child_frame_id>base_link</child_frame_id>
    </plugin>

    <plugin
      filename="gz-sim-joint-state-publisher-system"
      name="gz::sim::systems::JointStatePublisher">
      <topic>joint_states</topic>
    </plugin>
  </gazebo>
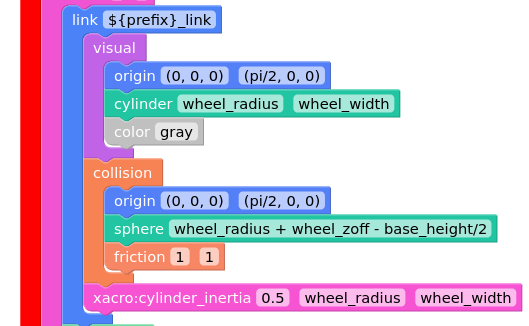
We also need to simulate friction on the wheels or else the robot will not be able to move in the sim.
Add the friction tag in the wheel macro we made:
      <link name="${prefix}_link">
      <visual>
        <origin xyz="0 0 0" rpy="${pi/2} 0 0"/>
        <geometry>
            <cylinder radius="${wheel_radius}" length="${wheel_width}"/>
        </geometry>
        <material name="Gray">
          <color rgba="0.5 0.5 0.5 1.0"/>
        </material>
      </visual>

      <collision>
        <origin xyz="0 0 0" rpy="${pi/2} 0 0"/>
        <geometry>
          <cylinder radius="${wheel_radius}" length="${wheel_width}"/>
        </geometry>

        <surface><friction><ode>
          <mu>1.0</mu>
          <mu2>1.0</mu2>
        </ode></friction></surface>
      </collision>

      <xacro:cylinder_inertia m="0.5" r="${wheel_radius}" h="${wheel_width}"/>
    </link>
Creating a simulated world
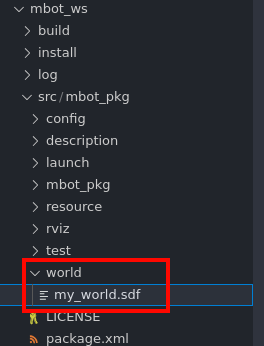
Last thing Gazebo needs is a simulated world for the robot to move in
make a folder called world and download this file my_world.sdf into that folder:
If you are in Robomasters here is a gazebo world that is the 2025 field:
It contains 2 files a field.sdf and mesh.stl they have to stay together in the same folder. You can later swap mesh.stl or any .stl model, with the same filename, to import you own map!
If you want to make a custom world here is a guide from Articulated Robotics on how to do so
Adding Gazebo to launch file
Finally to update the launch file we have to get the bridge_config.yaml and my_world.sdf
  def generate_launch_description():
    pkg_share = get_package_share_directory('mbot_pkg') # gets the location of mbot_pkg
    default_model_path = os.path.join(pkg_share, 'description', 'mbot_description.urdf') # gets the location of the urdf
    default_rviz_config_path = os.path.join(pkg_share, 'rviz', 'config.rviz') # gets the location of the rviz config
    bridge_config_path = os.path.join(pkg_share, 'config', 'bridge_config.yaml') # gets location of gazebo config
    world_path = os.path.join(pkg_share, 'world', 'my_world.sdf') # gets the gazebo world file

    robot_state_publisher_node = Node(
    ...
We also must add the use_sim_time parameter to robot_state_publisher because we are using a simulator
      robot_state_publisher_node = Node(
        package='robot_state_publisher',
        executable='robot_state_publisher',
        parameters=[{'robot_description': Command(['xacro ', default_model_path])},
        {'use_sim_time': LaunchConfiguration('use_sim_time')}]
    )
Here are the nodes required to start Gazebo
      gz_server = GzServer(
        world_sdf_file=world_path,
        container_name='ros_gz_container',
        create_own_container='True',
        use_composition='True',
    )
    ros_gz_bridge = RosGzBridge(
        bridge_name='ros_gz_bridge',
        config_file=bridge_config_path,
        container_name='ros_gz_container',
        create_own_container='False',
        use_composition='True',
    )
    ros_gz_sim_share = get_package_share_directory('ros_gz_sim')
    gz_spawn_model_launch_source = os.path.join(ros_gz_sim_share, "launch", "gz_spawn_model.launch.py")
    spawn_entity = IncludeLaunchDescription(
        PythonLaunchDescriptionSource(gz_spawn_model_launch_source),
        launch_arguments={
            'world': 'my_world',
            'topic': '/robot_description',
            'entity_name': 'mbot',
            'z': '0.65',
        }.items(),
    )
At the bottem remember to comment out my_node and swap it out for the Gazebo nodes
    return LaunchDescription([
        DeclareLaunchArgument(name='use_sim_time', default_value='False', description='Flag to enable use_sim_time'),
        # joint_state_publisher_gui_node, # debugs urdf joints
        # my_node, # swaps joint_state_publisher_gui_node for physical robot
        robot_state_publisher_node, # publishes urdf to ROS
        rviz_node, # starts rviz

        # stuff to start gazebo
        ExecuteProcess(cmd=['gz', 'sim', '-g'], output='screen'),
        gz_server,
        ros_gz_bridge,
        spawn_entity,
    ])
Remember to build because we added bridge_config.yaml and my_world.sdf to the package
colcon build --symlink-install
To run add the new argument use_sim_time:=True to correctly use Gazebo
ros2 launch mbot_pkg display.launch.py use_sim_time:=True
Always use use_sim_time:=True flag when using Gazebo
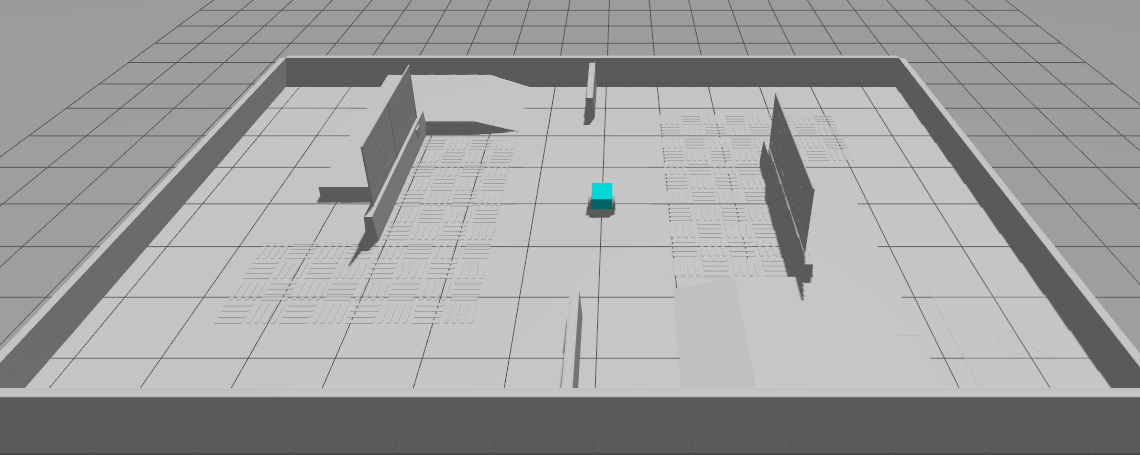
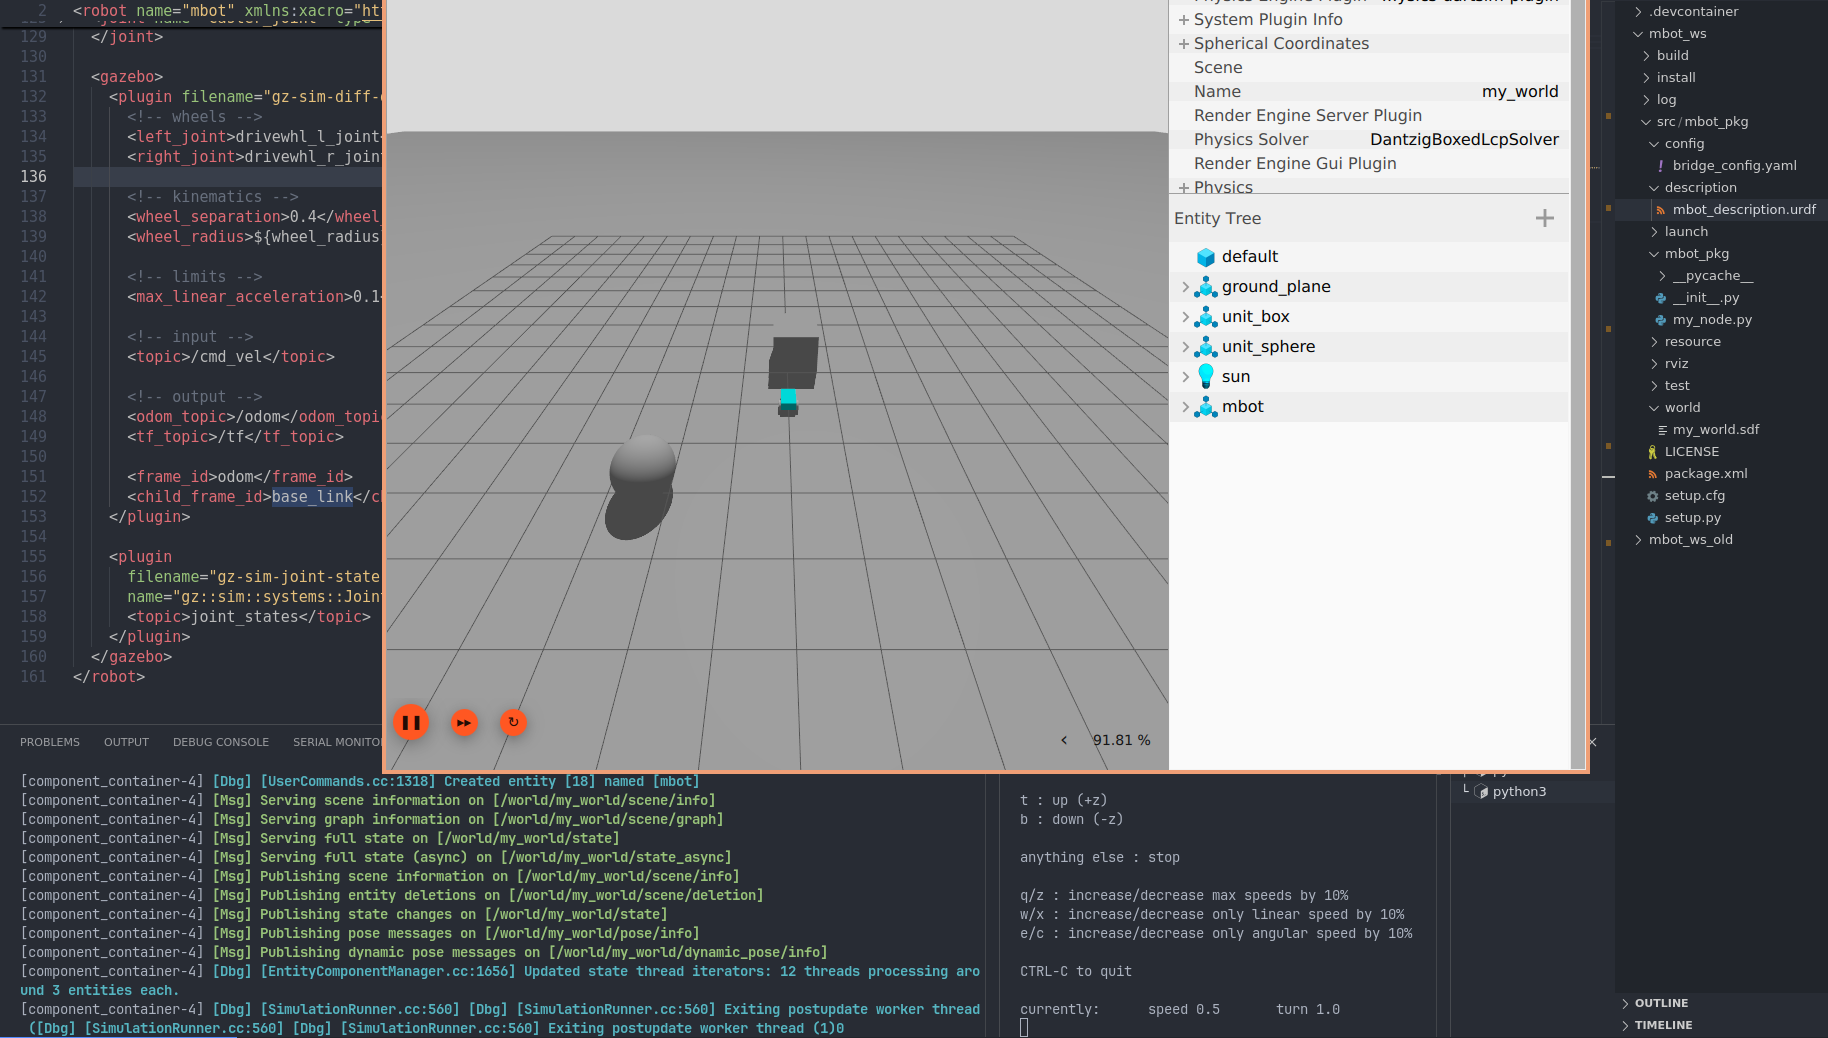
Result:
To move the robot, in a different terminal run:
ros2 run teleop_twist_keyboard teleop_twist_keyboard --ros-args -p stamped:=true
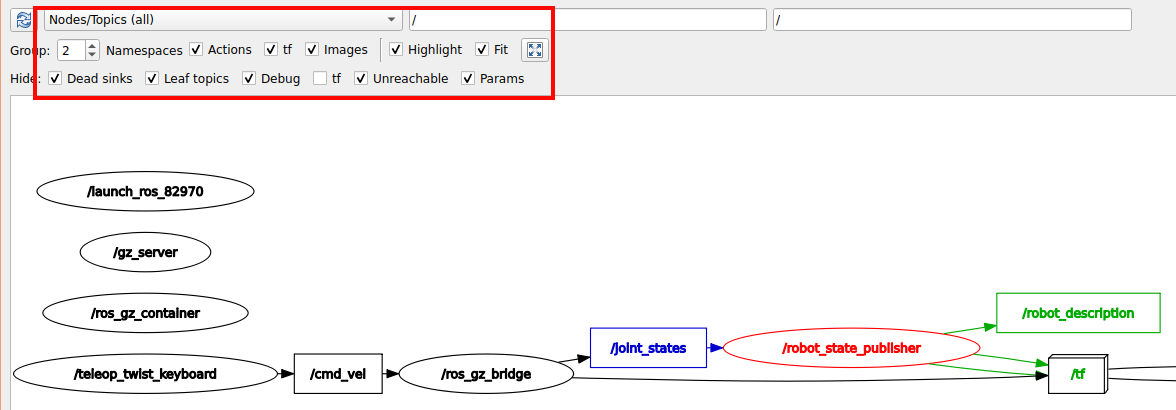
rqt_graph output:
Final code
TODO: add code